In the art of graffiti there are many types of design in their construction. Call it like wildstyle, MindGem, Throwup, flava, bubble and many more. But the most easily made and studied by a beginner is graffiti bubble effects model. That's because in the making we just made a circle, not a round circle but an oval circle appropriate design will be made. Then how to make graffiti bubble letters?
This is not too difficult, even for the novice or the will to learn. To give the all letters and Standard and Poor a rounded bubble-look you have to construct them out of round shapes. All letters can be created by combining several oval and / or circle. And below are the steps how to create a bubble effect on your graffiti, see and follow the following instructions properly.
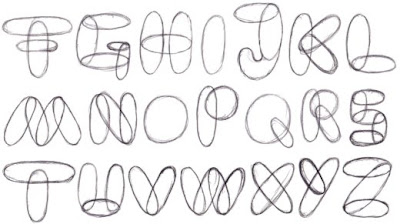
Start out by laying down the basic structure of the letter with ovals and circles. There are certainly several possibilities how you can do this for some letters. Consider my examples just as a suggestion.
Draw these shapes very lightly, so that you can erase and correct them easily. And be sure to do just that until they look good.
Draw these shapes very lightly, so that you can erase and correct them easily. And be sure to do just that until they look good.

Trace the outer shape of the letters with a stronger stroke now, so that you get clear and firm borders. You don't have to follow the form of ovals and circles precisely while doing this. For example, I smoothed the connection between ovals and circles for all letters, except the A.
Also add holes into the letters who need them (A, B, and D).
Note that the hole in the D is not perfectly round, but flattened on the left side. It looks just like a smaller D. This makes it easier to recognize the D for what it is. With a circular hole inside it may be falsely considered as an O.
Also add holes into the letters who need them (A, B, and D).
Note that the hole in the D is not perfectly round, but flattened on the left side. It looks just like a smaller D. This makes it easier to recognize the D for what it is. With a circular hole inside it may be falsely considered as an O.

Erase the inner lines afterwards so that only the border of the bubble letters remains.

And now you can color the letters to your liking. Just filling them with one plain color may be a bit boring, though. Consider giving them a shiny effect by using two additional color values:
Draw brighter stripes along one side of the letter, as if the letter was reflecting light at these places. Then draw a darker stripe on the opposite side, as if it lies a in shadow. This is quickly done and makes the letters much more attractive.
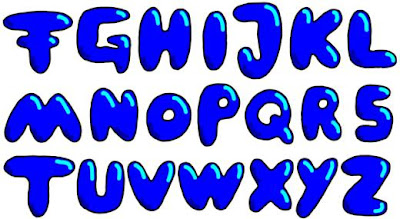
So these were the steps how to draw bubble letters. Below I show you an example how you can construct the other letters of the alphabet in the same way. I just cheated with the J, because its lower end is not an oval, but a curved shape.
Since the first five letters are shown above already it starts with an F here.

And here is what these letters look like after being traced and colored:

Now you know how to draw bubble letters when you need them the next time.
Please give your comments about this graffiti image, Thanks....
{ 0 comments... Views All / Send Comment! }
Post a Comment